A14E Service Manual Part 2
<-- back to A14E Service Manual

Nissan Factory service manual for the A14E fuel injected engine, 1978 edition.
A14E Service Manual A14E Service Manual Part 2 Engine Overhaul & Service Data
You can help us out! If you can type Japanese, please click Edit and type in the text. Also need help translating. Thanks!

|
A型 エンジン A14型EGI仕様
(53年適合車版) 1978 整備要領書 |
A-series Engine A14 type EGI specification
(1978 Standards Conforming Car) 1978 Service Manual |
Engine Overhaul 114
7. エンジン本体のオーバーホール Engine overhaul
Overhaul Notes 114
7-1 オーバーホール上の注意事項 Notes on overhaul
page 114
https://i297.photobucket.com/albums/mm219/ddgonzal/A14E/114.jpg

Disassembly 115
7ー2 分解 Disassembly
page 115
https://i297.photobucket.com/albums/mm219/ddgonzal/A14E/115.jpg

page 116
https://i297.photobucket.com/albums/mm219/ddgonzal/A14E/116.jpg

page 117
https://i297.photobucket.com/albums/mm219/ddgonzal/A14E/117.jpg

page 118
https://i297.photobucket.com/albums/mm219/ddgonzal/A14E/118.jpg

Inspection, Correction, Replacement 119
7-3 点検、修正、交換 Inspection, Correction, Replacement
Cylinder Head and Valve 119
(1) シリンダー ヘッド及びバルブ
page 119
https://i297.photobucket.com/albums/mm219/ddgonzal/A14E/119.jpg

page 120
https://i297.photobucket.com/albums/mm219/ddgonzal/A14E/120.jpg

page 121
https://i297.photobucket.com/albums/mm219/ddgonzal/A14E/121.jpg

page 122
https://i297.photobucket.com/albums/mm219/ddgonzal/A14E/122.jpg

Page 123
| ⑥ バルブ シート インサート ・バルバ シートを交換する場合は、 シリンダー ヘッドを150~160°Cに加熱して、圧入する。 ・焼きばめ後、シート面を仕上げる。
標準締代 0.064 ~ 0.096 mm (参考) ⑦ バルブ スプリング ・各スプリングの自由長、取り付け張力を測定 し限度を?えてるときは、交換する。
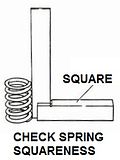
(単位:mm) ンナー アウター 自由長 43.5 46.0 自由長限度 41.5 44.5 直角定規で各スプリングの直角度を測定し、 スプリングのたおれが限度以上のときは、交 換する。ただし直角度はスプリング上面と直 角定規のすき間で表れす。
(単位:mm) 直角度限度 (インナー アウター共) 1.3 |
6. Valve seat insert
Interference Fit 0.064 ~ 0.096 mm (Reference) 7. Valve spring
(Unit: mm) Inner Outer Free length 43.5 46.0 Free length limit 41.5 44.5 The squareness of each spring is measured at a right angle ruler, of the spring collapse when the above limit, be replaced. However straight angle to appear in the gap of the spring top and square.
(Unit: mm) Straightness limit (Inner, outer both) 1.3 |

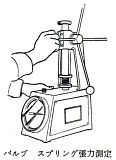
バルブ スプリング張力測定
Valve spring tension measurement
http://i297.photobucket.com/albums/mm219/ddgonzal/A14E/th_123a.jpg
直角定規 Square http://i297.photobucket.com/albums/mm219/ddgonzal/A14E/th_123b.jpg バルブ スプリング直角度の点検 Check spring squareness
Also see: Valve spring testing
Cylinder Block 124
(2) シリンダー ブロック
page 124
https://i297.photobucket.com/albums/mm219/ddgonzal/A14E/124.jpg

Piston, Piston Ring, Conrod 125
(3) ピストン、ピストン リング、コンロッド
page 125
https://i297.photobucket.com/albums/mm219/ddgonzal/A14E/125.jpg

page 126
https://i297.photobucket.com/albums/mm219/ddgonzal/A14E/126.jpg

page 127
https://i297.photobucket.com/albums/mm219/ddgonzal/A14E/127.jpg

Piston Ring Gap Top 0.02 - 0.35 mm 2nd 0.15 - 0.30 mm Oil 0.03 - 0.09 mm
Crankshaft, Main Bearing 128
(4) クランクシャフト、メーン ベアリング
page 128
https://i297.photobucket.com/albums/mm219/ddgonzal/A14E/128.jpg

page 129
https://i297.photobucket.com/albums/mm219/ddgonzal/A14E/129.jpg

Camshaft 130
(5) カマシャフト Camshaft
page 130 #English
https://i297.photobucket.com/albums/mm219/ddgonzal/A14E/130.jpg

1) カムシャフト曲がり·カムシャフトの曲がりを測定し、限度以上のときは交換する。
曲 が り (単位:mm) 標 準 0.015 以下 限 度 0.05
注意:曲がりはダイヤル ゲージをセンター ジャーナルに当てて、カムシャフトを回転させたときの読みの ½である。

カムシャフトの曲がり測定
カムシャフト ジャーナル径とカムシャフト ベアリング内径標準 (単位:mm)
,
No. 1(フロント)
,
No. 2
,
No. 3
,
No. 4
,
No. 5
ジャーナル径
,
43.783~43.796
,
43.283~43.296
,
42.783~42.796
,
42.283~42.296
,
41.208~41.221
ベアリング 内径
,
43.833~43.843
,
43.323~43.333
,
42.836~42.846
,
42.323~42.333
,
41.258~41.268
2) カムの高さ·カム ノーズ部にマイクロ メーターをあてて、カムの高さを測定する。
カムの高さ (単位:mm) 吸気 36.20 ~ 36.25 排気 35.93 ~ 35.98

カム高さ
3) カムシャフト エンド プレー·右図のように、ダイアル ゲージによりスラストすき間を測定する。すき間が限度を越えた場合は、ロケーティング プレートを交換する。
(単位:mm) 標準 0.035 ~ 0.085 限度 0.1

カムシャフト エンド プレーの測定
1) Camshaft bend: Measure the bend of the camshaft, and if it exceeds the limit, replace it.
Bend (unit: mm) Standard: 0.015 or less Limit: 0.05
NOTE: Bend is ½ the reading when a dial gauge is placed against the center journal and the camshaft is rotated.

Camshaft bend measurement
Camshaft journal diameter and camshaft bearing inner diameter standard (unit: mm)
,
No. 1(front)
,
No. 2
,
No. 3
,
No. 4
,
No. 5
Journal diameter
,
43.783~43.796
,
43.283~43.296
,
42.783~42.796
,
42.283~42.296
,
41.208~41.221
Bearing inner dia.
,
43.833~43.843
,
43.323~43.333
,
42.836~42.846
,
42.323~42.333
,
41.258~41.268
2) Cam height: Place a micrometer on the cam nose and measure the cam height.
Cam height (unit: mm) Intake 36.20 ~ 36.25 Exhaust 35.93 ~ 35.98

Cam height
3) Camshaft end play: Measure the thrust clearance with a dial gauge as shown in the right figure. If the clearance exceeds the limit, replace the locating plate.
(Unit: mm) Standard: 0.035 ~ 0.085 Limit: 0.1

Camshaft end play measurement
Other Components 131
エンジン本体のオーバーホール Engine body overhaul
(6) その他の構成都品 Other components
page 131 #English
https://i297.photobucket.com/albums/mm219/ddgonzal/A14E/131.jpg

1) クランク スプロケット及びカム スプロケット
·スブロケット歯部の点検(損傷、摩耗)をし、異常の場合は交換する。
·カムシャフトに組み付け、全面の振れが0.05mm以上あるときは、交換する。
2) バルプ ロッカー アーム、ロッカー シャフト
·バルプ ロッカー アームとロッカー シャフトの作動具合、ガタ及びロッカー アームのバル
ブ当り面の摩耗状態を点検し不良の場合は交換する。
3) チェーン テンショナー
·テンショナー ラバー シュー部の摩耗、スプリングのへたりを点検し、不良の場合 は交換する。
4) フライホイール
·フライホイールのクラッチ ディスク当り面を点検し、損傷、摩耗のあるときは修正又は交換する。
·ダイアル ゲージを使用し、クラッチ ディスク面の振れを測定し、振れが0.15mm以上あるときは、交換する。
·リング ギヤの歯部を点検し損傷、摩耗のあるときは交換する。
5) パイロット ブッシュ
·パイロット ブッシュの鳴き、焼き付きなど異常のある場合は、パイロット ブッシュ プーラー(特殊工具)を使用して、抜き取る。
·パイロット ブッシュの打ち込みは止まるところまで打ち込む。
注意:パイロット ブッシュ打ち込み後エンジンオイルを塗布する。
パイロット ブッシュ標準寸法 (単位:mm) 外径 17.0 内径 12.15

パイロット ブッシュ交換
特殊工具: ST1668 0000
1) Crank sprocket and cam sprocket
- Check the sprocket teeth (for damage or wear) and replace if there is any abnormality.
- After assembling to the camshaft, if the overall runout is 0.05 mm or more, replace.
2) Valve rocker arm, rocker shaft
- Check the valve rocker arm and rocker shaft for operation, play and wear on the valve contact surface of the rocker arm.
Replace if defective.
3) Chain tensioner
- Check the tensioner rubber shoe for wear and the spring for settling, and replace if defective.
4) Flywheel
- Inspect the clutch disc contact surface of the flywheel, and repair or replace if damaged or worn.
- Use a dial gauge to measure the runout of the clutch disc surface, and replace if the runout is 0.15mm or more.
- Inspect the teeth of the ring gear, and replace if damaged or worn.
5) Pilot bush
- If the pilot bush is squealing, sticking, or has any other abnormalities, use a pilot bush puller (special tool) to remove it.
- Drive the pilot bush in as far as it will go.
Note: Apply engine oil after driving the pilot bush in.
Standard dimensions of pilot bush (unit: mm) Outer diameter 17.0 Inner diameter 12.15

Pilot bush replacement
SPECIAL TOOL: ST1668 0000
Assembly 132
7-4 組立 Assembly
page 132
https://i297.photobucket.com/albums/mm219/ddgonzal/A14E/132.jpg

刻印を上側に向ける Direction stamped on the inside
トップリング
セカンドリング
オイルリング Top Ring
2nd Ring
Oil Ring
https://i297.photobucket.com/albums/mm219/ddgonzal/A14E/132a.jpg

ピストンリング組付 Piston Ring Assembly
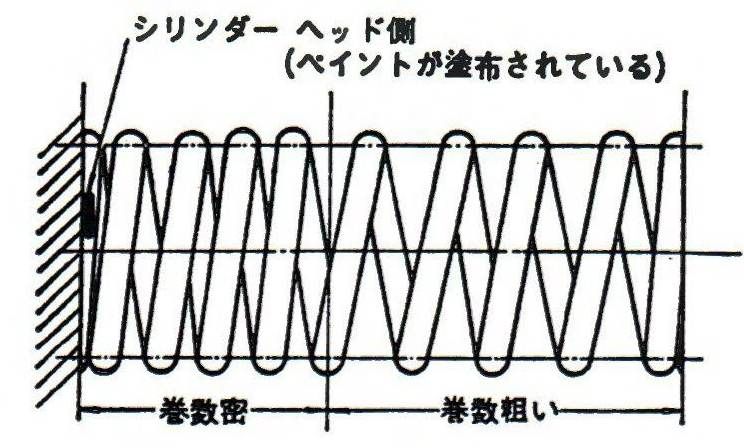
シリンダー ヘッド側 (ペイントが?布されている) Cylinder head side (Paint is applied)
https://i297.photobucket.com/albums/mm219/ddgonzal/A14E/132d.jpg
page 133
https://i297.photobucket.com/albums/mm219/ddgonzal/A14E/133.jpg

page 134
https://i297.photobucket.com/albums/mm219/ddgonzal/A14E/134.jpg

page 135
https://i297.photobucket.com/albums/mm219/ddgonzal/A14E/135.jpg

page 136
https://i297.photobucket.com/albums/mm219/ddgonzal/A14E/136.jpg

page 137
https://i297.photobucket.com/albums/mm219/ddgonzal/A14E/137.jpg

page 138
https://i297.photobucket.com/albums/mm219/ddgonzal/A14E/138.jpg

page 139
https://i297.photobucket.com/albums/mm219/ddgonzal/A14E/139.jpg

page 140
https://i297.photobucket.com/albums/mm219/ddgonzal/A14E/140.jpg

Service Data 141
8. サ=ビス データ Service Data
Standard Bolt, Nut Tightening Torque 141
8-1 標準ボルト、ナット締付トルク Standard Bolt, Nut Tightening Torque
page 141
https://i297.photobucket.com/albums/mm219/ddgonzal/A14E/141.jpg

Engine Torque Specs 142
8-2 主なエンジン関係締付トルク
page 142
https://i297.photobucket.com/albums/mm219/ddgonzal/A14E/142.jpg

Service Data 143
8-3 サービズ データ
page 143
https://i297.photobucket.com/albums/mm219/ddgonzal/A14E/143.jpg

page 144
https://i297.photobucket.com/albums/mm219/ddgonzal/A14E/144.jpg

page 145
https://i297.photobucket.com/albums/mm219/ddgonzal/A14E/145.jpg

<-- back to A14E Service Manual
¤