Instrument Panel Conversion
Cluster Gauge wiring is discussed here.
Overview
Also see: * Wiring Diagram * Wiring Harness Instrument Panel Harness * Cluster Gauge Removal
NOTE: * Manual vs Automatic harnesses differ * early harnesses were changed in April 1971 * RHD vs LHD differ * Round-gauge harness differs from Square-gauge
Meter Connector
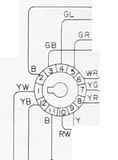
The Instrument Panel Harness uses this connector for the instrument panel (meter cluster):

Be aware that while all 1200s use this connector, the wiring order differs from 1200 round-gauge harness and 1200 rectangle gauge harness:
- a couple of the wires are connected to different pins
- The two M.B. (Master Beam/high beam) wires may be different colors
- Some clusters have a Brake warning lamp and the wire color varies. Other clusters have no Brake warning lamp and the wire for that pin is missing (No Connection)
Early Round Gauge Coupe, Sedan GL

Pin 3 1971: RY [M.B.]
Pin 3 1972: BW
Early rectangle gauge B120 truck (1971-1978)

Late Round Gauge 1979-1994 truck


Cluster Gauge USA


Round Gauge Cluster vs Rectangle Cluster
PROBLEM: Turn on the lights and smoke comes out.
If it smokes, it is not earthed properly. The cluster bolts to the dash metal frame. If you wish to temporarily work with it, jump a wire to the dash frame.
PROBLEM: indicator globes stay on, no IGN lights. Move right indicator, left indicator flashes. Signal to left and oil light flashes.
If you upgrade the rectangle cluster to round cluster, the wiring is different.
- Some pins in the circular dash connector are different. Pop the pins of the connector and re-insert in the appropriate order.
- Round Tachometer may be wired in series (differently from aftermarket tachometers) to the IGN circuit that's already under the dash (this is how the factory wired tachometers). Or in series with NEG side of coil if you wish to run wires from coil into cabin. Because the tachometer works by induction, it doesn't matter which side of the coil it is wired into. If your new dash has a tachometer be sure to investigate. There are two kinds of stock Datsun 1200 tachometer which look the same but are wired differently.
Dash Changes for Sedan, Ute and Station Wagon
I think it take a skinny little screwdriver, like you use for watches/sunglasses. The ones that come in the cheap set of 5 in a plastic case at most '$2 shops'. Loosen the prongs pushing a screwdriver in the wire side of the connector, while pushing with a small allen key in the other side. I'm sure there are professional tools to do the same job, but you can do it for cheap if you apply a little patience.
dattodude's original information sheet:

Main Forum discussion: POST Rectangle cluster to round cluster
- You will need to modify one or two wires
- Which wires depends on whether your car is a B110 rectangle car, or a B120 rectangle ute
- Also depends on which dash you are fitting: is it a B110 round cluster or a B120 round cluster?
Dash Change from Round to Rectangle
Conversion from 1979-1987 round dash to circa 1977 bar meter. Instead of rearranging the pins, the plug was cut and all the wires fitted with bullet connectors.
http://datsun1200.com/uploads/photos/30662.jpg

Brown dash pad re-painted black
http://datsun1200.com/uploads/photos/30664.jpg http://datsun1200.com/uploads/photos/30663.jpg


Pinout
| pin | 1978 AUS | late 1200 | 620 round | SHOOEYS | round USA | NON-USA |
|---|---|---|---|---|---|---|
| 1 YW TEMP | YW | YW | YW | YW | YW | |
| 2 B GROUND | B | B | B | B | B | |
| 3 GB T/S,right | GB | GB | GB | GB | GB | |
| 4 GL dash lamps | LG | GL | GL | GL | GL | |
| 5 GR T/S, left | GR | GR | GR | GR | ||
| 6 WR CHG | WR | WR | WR | WR | ||
| 7 YG BRAKE WARN | - | YG | YG | - | ||
| 8 G 12V | G | G | YR | G | ||
| 9 Y FUEL | Y | Y | Y | Y | ||
| 10 RW BEAM | B GROUND | L ? | L | RW | ||
| 11 RW BEAM | RW | RW | B | RY | ||
| 12 YB OIL | YB | YB | YB | YL |
Late Round Gauge (1979-1994)
620 intro USA - round gauge looks exactly like the 1200 cluster


Speedometer
The speedometer has a light for use at night. See the lamp section.
Speed Switch and Buzzer
* AUS: Amplifier for B120 ute Throttle Opener Assembly * JDM: 1972 speed switch for buzzer of excess velocity * USA: 1973 speed switch activated Throttle Opener
Main: Speed Switch

Cluster
The cluster contains:
Gauges * Fuel Gauge (Petrol/Gas gauge). See Fuel Gauge Wiring * Water temperature gauge. See Temperature Gauge Wiring
Indicator lamps (see "Dash Lights" below) * High beam indicator lamp (M.B.) * Left Turn Signal indicator lamp * Right Turn Signal indicator lamp
Warning lamps (see "Dash Lights" below) * Brake failure lamp (Japan GL & USA) * CHG/IGN failure lamp * Oil pressure indicator lamp
Optional * Tachometer. See Tachometer Wiring * Clock. See Clock Wiring
Gauges
The coolant/water temperature gauge incorporates a voltage regulator.
* If both the water and fuel gauges are off, suspect the regulator * If only one gauge is incorrect, suspect a bad connection, usually at the sender
See main articles: Fuel Gauge Wiring Temperature Gauge Wiring
Dash Lights
Dash lights are idiot lights and illumination lights.
Dash Lamps - OIL - CHG - BRAKE - M.B. - Turn Signals (direction indicators) - Illumination lights
Pre-start Check
These dash lights should light up when you turn the key to ON, before you start the car:
- OIL pressure lamp
- CHG lamp
Both should go out as soon as the engine is started.
These do NOT light up on the pre-start check:
- Brake lamp
- Beam/M.B. lamp
Troubleshooting Oil Light
Low Oil Pressure warning lamp

The sensor for the Oil pressure lamp is on the fuel pump just above the oil filter (left side of A-series engine):

The sensor is for an "idiot light". It simply connects the wire to ground when there is oil pressure. So before you start the engine (IGN key on), the Oil lamp bulb is connected to earth/ground through this switch and lights up. As soon as the engine starts and pressure builds, it disconnects the ground circuit so that lamp goes off.
If the lamp never lights up (IGN key on, engine not started):
- Be sure the wire at the oil pump is connected to the connector
- Pull it off and then on again to ensue it is tightly connected. If it is not, you can slightly crimp it with pliers to make it fit better
Check the lamp again. If it still doesn't come on:
- Reach behind the dash and twist the bulb out. If it is burnt out, replace it
If the light comes on (IGN key on, engine not started), but does not go *off* when the engine starts:
- Be sure the wire at the oil pump is connected to the spade connector. If it is off and lying against the engine or body is has a natural earth/ground and so won't work correctly
If that is not the problem:
- Disconnect the wire at the pump. Place it where it doesn't touch metal. Test the light again (with IGN key on):
- Light is off: replace the sensor. One from most any Datsun model will fit.
- Light stays on: You've got an unusual problem with the wiring or dash gauge cluster
This test is for functionality of the light. You don't need to start the engine to test this. If the light checks out OK, but there is no pressure or you suspect so, see Lubrication System Diagnoses.
Troubleshooting Dash Lights
After more than 30 years, these sometimes don't work. Could be a burnt-out bulb, corroded contact, or broken wire (turn signal indicators use wires).
Testing dash lights

Cleaning dash light contacts

Clean the contacts with a pencil eraser, sandpaper, or electrical contact cleaner.
Turn Signal Lamps
The dash indicator lamps should light when the IGN in ON, and the turn signal lever is moved up or down. If the exterior indicator lamps come on, but not the dash lamp, it's time to look more closely at the dash.
- Front or Rear indicators don't come on: Not a dash problem. Check Turn Signals
- Both L and R dash lamps don't come on: Flash can problem? Dash not grounded? See below
- One dash lamp doesn't work L or R -- examine dash wiring as follows
For Round Gauge dash, the indicators are on each side of the Speedometer at the top.

Pin 3 (Green/Black wire) Turn Signal Right circuit (12V supplied by Turn Signal Switch)
Pin 5 (Green/Red wire) Turn Signal Left circuit (12V supplied by Turn Signal Switch)
Earth: Tab at bottom of cluster
If you're getting 12V at the round connector, but the lamp doesn't light, check the bulb, and the connections. The bulb socket wire connects to the cluster with a spade connector, and sometimes the spade terminal on the cluster will break off. Be careful when removing the wire!
The bulb is earthed via contact with the cluster metal body. If the socket or the spade connector is slightly corroded, the bulb may not work. A pencil eraser will clean up the brass coating. The bottom contact is some kind of lead, and can be scraped clean with a screwdriver tip.

Illumination Lamps
The lamps should light when the Lighting Switch is in the Park or Headlamps position.
NOTE: For AUS-spec 1200s, twist the light switch bulb. This bright/dim function may be broken and only work in one position.
For Round Gauge dash, there are two bulbs in the Speedometer and one bulb in the center of the combo gauge.

Pin 4- Illumination Lamp circuit (12V supplied by Lighting Switch)

Master Beam Pilot Lamp
M.B. or BEAM light goes on when headlights are on and Dimmer Switch is flipped forward.

One of the pins is 12V and one is Ground. With headlights on, check for both signals when switch is pushed forward. If there is no 12V, check the H fuse. With switch in Low Beam position both pins will be 12V unless the bulb is burned out.
Ground Pin: RW or RY or B Supply Pin: RW or RY See Meter Connector section above
Differing various years per Wiring diagrams * So check your actual car UK WW intro 1971 1972 1973 1978 1989 Supply: RY RY RW RW RY RY RW RW Ground: RY RW RY RY RW RY B ?
620 1978 120Y Supply: RW Pin 10 RW Pin 11 RW Pin 8 Ground: B Pin 11 B Pin 10 B Pin 4

M.B. Wiring Schematic

Reference: Wiring Diagram Reference: Lamp Wiring
Brake
See Main Article: Brake_Wiring#Schematic

Ground
- Illumination lights are earthed via the dash.
- Warning lights and gauges are not earthed via dash, but instead through the wiring harness connector
SO, When checking the dash illumination lights, cluster must be earthed by bolting it to the dash frame. Alternatively, for testing, a temporary jumper cable may be attached from the tab to the metal frame.
Tab at bottom must be screwed to dash

¤